When it comes to email security, SPF, DKIM, and DMARC are critical tools for protecting your domain from phishing and spoofing. These protocols ensure your emails are authenticated, reducing the risk of fraudulent activity and improving deliverability. Both Google Workspace and Microsoft 365 support these protocols, but their setup processes differ slightly.
Key Takeaways:
- SPF specifies which servers can send emails for your domain.
- DKIM ensures emails aren’t altered in transit using a digital signature.
- DMARC provides policies for handling emails that fail SPF/DKIM checks and enables reporting.
Quick Highlights:
- Google Workspace simplifies setup with auto-DNS configurations for Google Domains but uses a single TXT record for DKIM.
- Microsoft 365 requires manual configuration with two CNAME records for DKIM.
Why It Matters:
- Phishing attacks surged 1,270% in 2024, with 91% of cyberattacks starting via email.
- Proper email authentication can reduce phishing success by 70% and improve deliverability by 10–20%.
Below, you’ll find a detailed guide on setting up SPF, DKIM, and DMARC for both platforms, along with a comparison to help you choose the right solution for your needs.
How to Set Up SPF, DKIM, and DMARC for Gmail
Setting Up SPF, DKIM, and DMARC in Google Workspace
Google Workspace makes setting up email authentication straightforward by generating the necessary DNS records for you. All you have to do is copy and paste them into your DNS settings. If you purchased your domain through Google Domains or Squarespace, Google Workspace automatically adds the DKIM key to your DNS settings.
Keep in mind that DNS changes can take anywhere from a few minutes to up to 48 hours to fully propagate.
SPF Setup in Google Workspace
SPF, or Sender Policy Framework, is used to specify which IP addresses are authorized to send emails on behalf of your domain. To set it up, log in to your DNS provider’s management portal and add the following TXT record:
- Name/Host:
@ - Type: TXT
- Value:
v=spf1 include:_spf.google.com ~all
The ~all at the end indicates a "soft fail." This means emails that don’t pass the SPF check will still be accepted but flagged as suspicious – ideal during the initial setup phase.
If you’re using multiple email services (e.g., Google Workspace and a marketing platform like Mailgun), you’ll need to combine them into a single SPF record. For example:
v=spf1 include:_spf.google.com include:mailgun.org ~all
It’s crucial to consolidate all email services into one SPF record because each include: statement triggers a DNS lookup. DNS lookups are capped at 10, so exceeding this limit can cause issues. To stay within the limit, consider "flattening" the record by replacing some include: entries with their corresponding IP addresses using the ip4: mechanism.
After saving the record, verify your setup using an SPF checker tool or the Google Admin Toolbox.
DKIM Setup in Google Workspace
DKIM, or DomainKeys Identified Mail, ensures your emails remain unaltered during transit by adding a digital signature. You can generate your DKIM key in the Google Admin Console by navigating to Apps > Google Workspace > Gmail > Authenticate Email. Once generated, you’ll need to add the provided TXT record to your DNS settings.
Google recommends using a 2048-bit RSA key for stronger security. However, if your DNS provider doesn’t support long TXT strings, you can opt for a 1024-bit key instead. The TXT record typically looks like this:
- Name/Host:
google._domainkey - Type: TXT
- Value:
v=DKIM1; k=rsa; p=MIGfMA0GCSqGSIb3DQEBAQUAA…
Add this record to your DNS settings. Some DNS providers automatically append your domain name to TXT records, so double-check to ensure the configuration is correct. Afterward, go back to the Google Admin Console and click Start Authentication to verify the setup.
For better security, make it a habit to rotate your DKIM keys annually.
Once SPF and DKIM are in place, you’re ready to configure DMARC or use automated DKIM, SPF, and DMARC setup to streamline the process.
DMARC Setup in Google Workspace
DMARC, or Domain-based Message Authentication, Reporting, and Conformance, tells receiving email servers how to handle emails that fail SPF or DKIM checks. It also requires both SPF and DKIM to be properly set up beforehand.
To configure DMARC, add another TXT record to your DNS:
- Name/Host:
_dmarc - Type: TXT
- Value:
v=DMARC1; p=none; rua=mailto:dmarc-reports@yourdomain.com
Starting with a p=none policy allows you to monitor authentication failures without impacting email delivery. Set up a dedicated email address, such as dmarc-reports@yourdomain.com, to receive these reports and review them regularly.
Once you’re confident everything is functioning as expected, you can tighten the policy. Switch to p=quarantine to send failing emails to the spam folder, and eventually to p=reject to block them entirely. During testing, adding pct=100 to your DMARC record ensures the policy applies to all emails, making it easier to troubleshoot.
Properly configured DMARC can improve email deliverability rates by 10–20%. This highlights the role of Google mailboxes in maintaining high sender reputation. Moreover, as of early 2024, both Google and Yahoo require DMARC for bulk email senders.
Setting Up SPF, DKIM, and DMARC in Microsoft 365
Unlike Google Workspace, Microsoft 365 automatically signs emails sent from its default onmicrosoft.com domain. However, if you’re using a custom domain, you’ll need to configure these settings manually. To do this, you’ll rely on the Microsoft 365 Defender portal and your DNS provider. Keep in mind that changes to DNS records can take some time to propagate.
SPF Setup in Microsoft 365
To set up SPF for Microsoft 365, add the following TXT record to your DNS settings:
- Name/Host: @
- Type: TXT
- Value:
v=spf1 include:spf.protection.outlook.com ~all
Including spf.protection.outlook.com is essential for Microsoft 365 to authenticate outgoing emails properly. If you’re using additional email services, like Salesforce or marketing platforms, you’ll need to combine their SPF mechanisms into a single record. For example:
v=spf1 include:spf.protection.outlook.com include:_spf.salesforce.com ~all.
Remember, each "include:" in an SPF record counts as a DNS lookup, and there’s a limit of 10 lookups. Exceeding this limit can cause SPF authentication to fail. Also, don’t overwrite existing SPF records – always append the Microsoft 365 directive to your current record.
DKIM Setup in Microsoft 365
Setting up DKIM requires both the Microsoft 365 Defender portal and your DNS provider. Start by accessing the Defender portal at https://security.microsoft.com/authentication and navigating to the DKIM tab. Select your custom domain, enable DKIM signing, and the portal will generate two CNAME records (commonly named selector1 and selector2) with values tailored for your domain.
Add these CNAME records to your DNS:
- Name/Host:
selector1._domainkey - Type: CNAME
- Value:
selector1-yourdomain-com._domainkey.tenantdomain.onmicrosoft.com
If you’re using Cloudflare, ensure that the proxy status for these records is set to "DNS only" (proxy OFF) so Microsoft can detect them properly.
Once the DNS changes propagate, return to the Defender portal to finalize DKIM signing. Microsoft 365 uses 2048-bit RSA keys by default, offering stronger security than the older 1024-bit keys.
"The main factor that determines when a custom domain starts DKIM signing outbound mail is the CNAME record detection in DNS." – Microsoft Learn
For organizations managing multiple domains, you can automate DKIM configurations using Exchange Online PowerShell commands like Get-DkimSigningConfig and Set-DkimSigningConfig.
With SPF and DKIM in place, you’re ready to configure DMARC to complete your email authentication setup.
DMARC Setup in Microsoft 365
DMARC is entirely configured through your DNS provider. Add a new TXT record with these details:
- Name/Host:
_dmarc - Type: TXT
- Value:
v=DMARC1; p=none; rua=mailto:dmarc_reports@yourdomain.com;
Start with a "p=none" policy to monitor email activity without affecting delivery. This allows you to gather data and identify any issues before enforcing stricter policies. Make sure to set up a dedicated email address to receive aggregate DMARC reports and review them regularly.
Microsoft will begin enforcing DMARC on May 5, 2025, for domains sending over 5,000 messages daily to consumer addresses like Outlook.com and Hotmail. At a minimum, domains must have a "p=none" policy with either SPF or DKIM alignment.
"One of the most common pitfalls in DMARC implementation is rushing to a ‘reject’ policy (p=reject) too quickly. The recommended approach is a gradual enforcement policy, starting with p=none, then moving to p=quarantine, and finally to p=reject as you gain confidence in your configuration." – CurlyBinaries
After monitoring DMARC reports for several weeks, you can gradually strengthen your policy to "p=quarantine" and eventually "p=reject." This step-by-step process minimizes the risk of legitimate emails being blocked due to configuration errors.
It’s worth noting that Microsoft 365 doesn’t provide built-in dashboards for DMARC analytics, so you may need third-party tools for detailed reporting and insights.
sbb-itb-36f7bf9
Google Workspace vs Microsoft 365: Setup Comparison
Google Workspace vs Microsoft 365 Email Authentication Setup Comparison
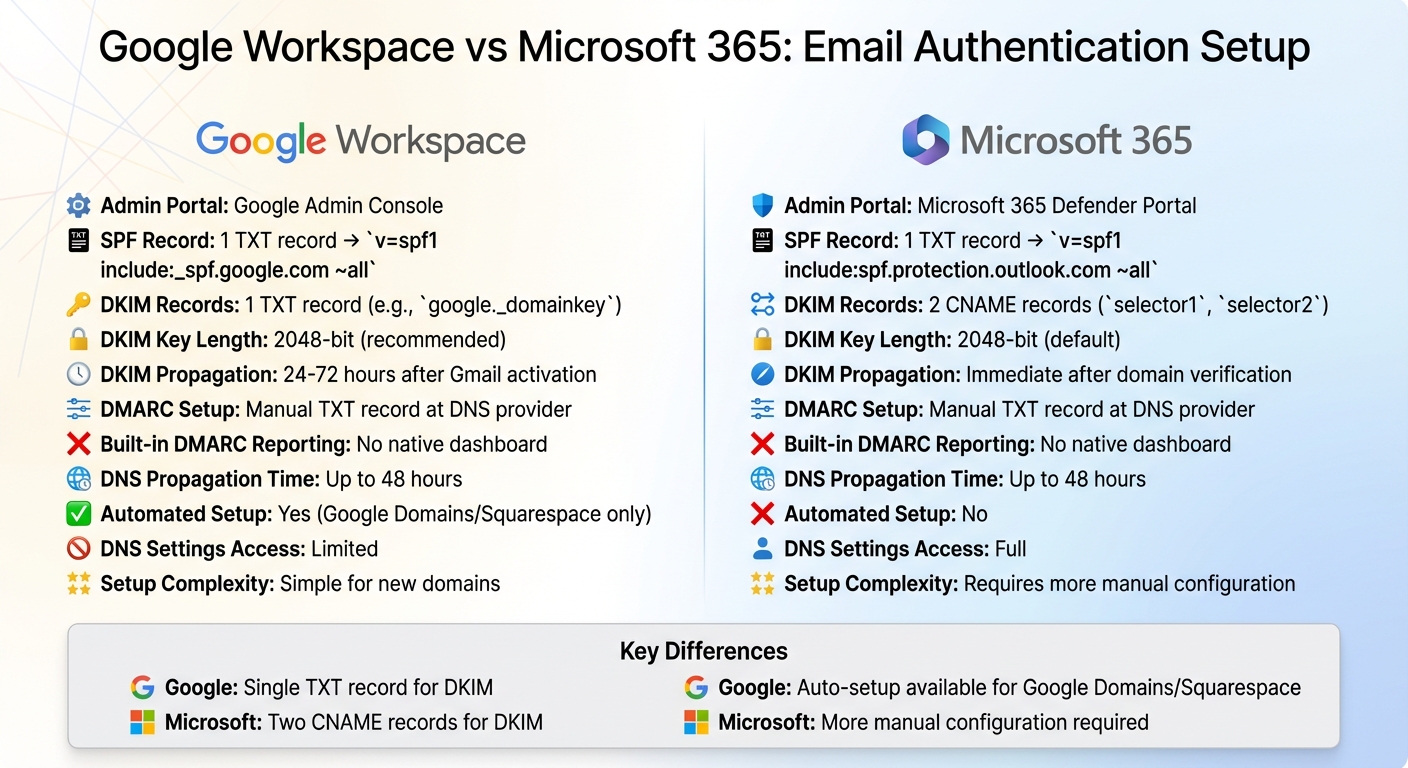
When it comes to setting up email authentication, both Google Workspace and Microsoft 365 require manual DNS record creation for SPF, DKIM, and DMARC. However, the steps differ slightly between the two. Google Workspace uses a single TXT record for DKIM, while Microsoft 365 requires two CNAME records (selector1 and selector2). Each platform provides setup guidance through their respective admin portals – Google Admin Console for Workspace and Microsoft 365 Defender portal for Microsoft 365.
Google Workspace does have one convenience: if your domain is hosted with Google Domains or Squarespace, the SPF, DMARC, and DKIM setup is automatically generated and added to your DNS settings without manual intervention.
A notable example of these differences in action occurred in November 2025. Partha Srinivasan, frustrated with ongoing email deliverability and DMARC issues, migrated from Google Workspace to Microsoft 365. He explained, "Repeated email deliverability issues, constant DMARC headaches, and Google’s increasing restrictions" were the driving factors behind his decision. After manually updating all DNS records for Microsoft 365, he shared that "Email is more stable now. No more weird bounces or deliverability issues" and praised the "cleaner" DNS management.
Comparison Table
| Feature | Google Workspace | Microsoft 365 |
|---|---|---|
| Admin Portal | Google Admin Console | Microsoft 365 Defender Portal |
| SPF Record Format | Single TXT record: v=spf1 include:_spf.google.com ~all |
Single TXT record: v=spf1 include:spf.protection.outlook.com ~all |
| DKIM Records | 1 TXT record (e.g., google._domainkey) |
2 CNAME records (selector1, selector2) |
| DKIM Key Length | 2048-bit (recommended) | 2048-bit (default) |
| DKIM Propagation Time | 24–72 hours after Gmail activation | Immediate after domain verification |
| DMARC Setup | Manual TXT record at DNS provider | Manual TXT record at DNS provider |
| Built-in DMARC Reporting | No native dashboard | No native dashboard |
| DNS Propagation Time | Up to 48 hours | Up to 48 hours |
| Automated Setup (Own Domains) | Yes, for Google Domains/Squarespace only | No |
| DNS Settings Access | Limited | Full |
| Setup Complexity | Simple for new domains | Requires more manual configuration |
For organizations managing multiple domains, automated DNS configuration tools can significantly cut setup time. What might normally take over 24 hours can be reduced to just 30 minutes with these solutions. This comparison underscores the key setup differences and provides insights for optimizing DNS configuration to improve email deliverability.
Best Practices and Recommendations
Automated DNS Configuration Solutions
Configuring DNS settings like SPF, DKIM, and DMARC manually can be a time-consuming task, especially when managing multiple domains. Automated solutions can significantly cut down on setup time and reduce errors.
Take Zapmail, for instance. It automates DNS configurations for both Google Workspace and Microsoft 365 mailboxes. Plus, it offers pre-warmed mailboxes, making them ready for outreach right out of the gate. The platform also includes AI-powered tools to help you create professional and consistent domain and mailbox names across your setup.
One standout feature is domain isolation, which keeps each client or campaign on its own domain. This way, if one domain faces deliverability issues, others remain unaffected. Zapmail also provides an all-in-one interface for managing SPF, DKIM, and DMARC records. On top of that, it integrates seamlessly with over 50 outreach platforms, letting you connect authenticated mailboxes directly to your existing workflow. This level of automation ensures your email deliverability practices are solid from the start.
Deliverability Best Practices
Automation is just the beginning. To truly optimize email deliverability, you need to adopt a few additional practices to ensure your emails consistently land in inboxes.
- Use pre-warmed mailboxes: Freshly created accounts are more likely to be flagged as spam. Pre-warmed mailboxes with established sending patterns perform better and reduce the risk of triggering spam filters.
- Gradually tighten your DMARC policy: Once SPF and DKIM are verified, adjust your DMARC policy step by step. This helps block unauthorized senders from using your domain without disrupting legitimate email traffic.
- Monitor authentication reports regularly: During the initial setup, review reports weekly, then shift to monthly monitoring. Tools like Cloudflare’s DMARC management simplify this process by providing user-friendly dashboards to spot configuration errors or spoofing attempts quickly.
- Keep SPF records concise: Avoid exceeding the 255-character limit for SPF records, as it can lead to validation errors. If you need to accommodate multiple email services, use the "include" mechanism instead of listing individual IP addresses. This keeps your records easier to manage and update.
Conclusion
Both Google Workspace and Microsoft 365 require SPF, DKIM, and DMARC for email authentication, but the technical details differ. Google Workspace uses _spf.google.com for SPF records and allows you to generate DKIM keys directly in its Admin Console. On the other hand, Microsoft 365 relies on spf.protection.outlook.com and requires CNAME records to configure DKIM.
While the setup process for these protocols might seem straightforward, managing configurations across multiple domains can quickly become a complex and error-prone task – especially for large-scale email campaigns.
This is where automation tools like Zapmail step in to simplify the process. These tools handle DNS configurations automatically, offer pre-warmed mailboxes with domain isolation, and integrate seamlessly with over 50 outreach platforms.
For businesses juggling multiple clients or campaigns, automation isn’t just helpful – it’s necessary. While manual DNS management might work for a single domain, it becomes unsustainable when scaling operations. Tools like Zapmail ensure consistent deliverability and make scaling both efficient and hassle-free.
FAQs
How does setting up SPF, DKIM, and DMARC differ between Google Workspace and Microsoft 365?
Both Google Workspace and Microsoft 365 require configuring SPF, DKIM, and DMARC through DNS records. However, the setup process varies in complexity and the tools provided by each platform.
SPF: Google Workspace uses a straightforward SPF record: v=spf1 include:_spf.google.com ~all. In contrast, Microsoft 365 typically employs a more intricate SPF record: v=spf1 include:spf.protection.outlook.com -all. Depending on your use of additional Microsoft services, you might need to include extra entries, making the setup a bit more involved.
DKIM: For Google Workspace, the process is relatively simple. You generate a DKIM key directly in the Admin console, publish a single CNAME record, and enable signing. Microsoft 365, on the other hand, requires two CNAME records (selector 1 and selector 2) to be added. Activating DKIM involves using either the Defender portal or PowerShell, adding an extra layer of complexity.
DMARC: While the DMARC record format is the same for both platforms, the monitoring and management tools differ. Google Workspace simplifies this process by integrating monitoring capabilities into its Admin console. In Microsoft 365, you’ll need to rely on the security and compliance center to view reports and make adjustments.
In summary, Google Workspace tends to offer a more straightforward setup process, while Microsoft 365 may demand additional steps and configurations.
How do automated DNS tools simplify managing SPF, DKIM, and DMARC for multiple domains?
Automated DNS tools make setting up and managing SPF, DKIM, and DMARC records much easier by taking the guesswork and manual effort out of the process. Instead of hopping between domain registrars to manually create TXT, CNAME, or NS records, these tools handle it for you. They generate the correct syntax for each domain and even allow bulk updates, ensuring that record formats, TTL values, and naming conventions stay consistent. This drastically reduces the chances of making configuration mistakes.
These tools also let teams manage multiple domains from one central dashboard. Adding new domains, rotating keys, or updating policies becomes a matter of just a few clicks. Plus, they can verify DNS changes and flag potential issues, making ongoing monitoring a breeze. For example, Zapmail takes this a step further by providing pre-warmed Google and Microsoft mailboxes with fully automated DNS configuration. This means users can focus on running high-deliverability email campaigns without getting bogged down in complicated DNS setups.
Why should you gradually strengthen your DMARC policy after setting it up?
Starting with a DMARC policy of p=none is a smart way to keep an eye on how your domain is being used without disrupting email delivery. It lets you gather useful data on both legitimate emails and suspicious activity tied to your domain.
By spotting and fixing authentication problems early on, you can make sure legitimate emails reach their destination without being mistakenly blocked. Once you’ve ironed out any issues and everything is running smoothly, you can confidently shift to stricter policies like quarantine or reject to shield your domain from misuse.