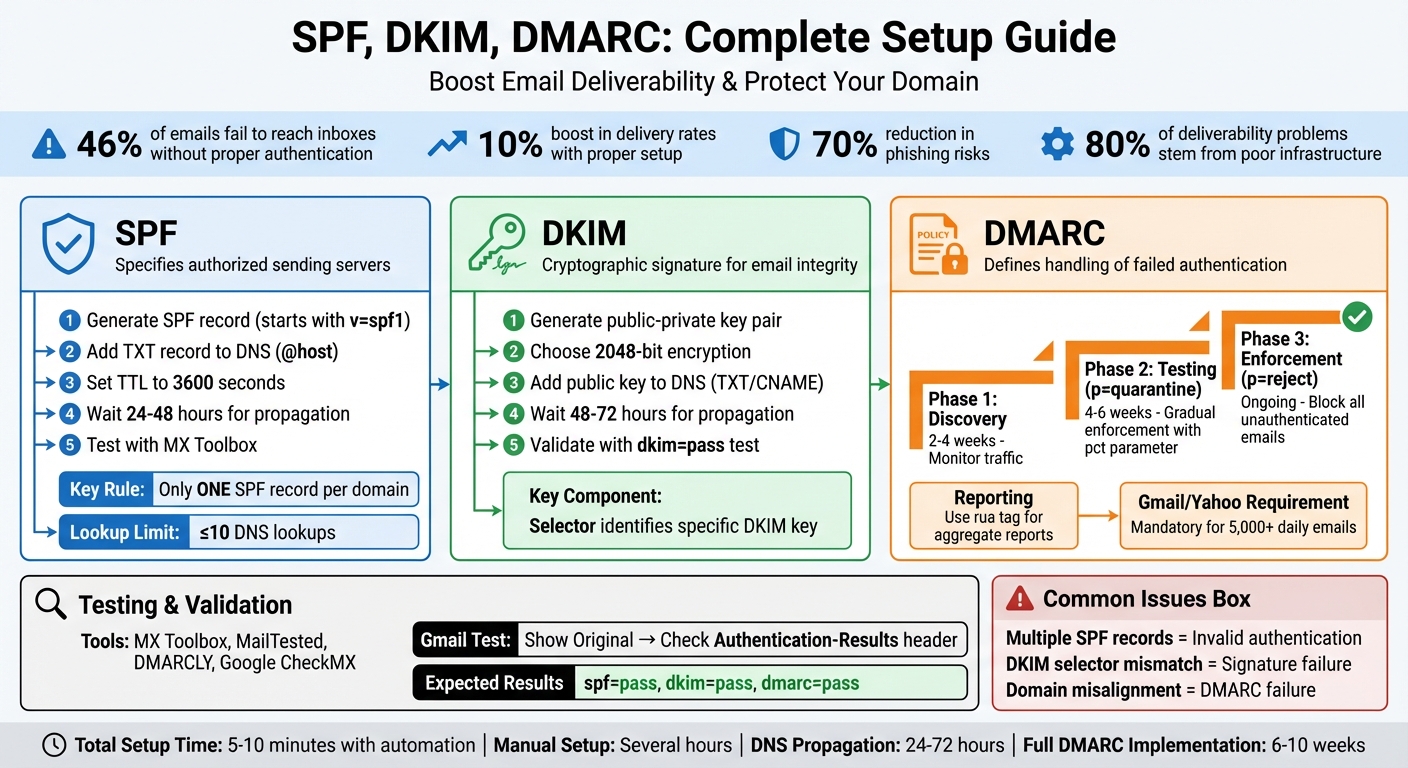
Want your emails to land in inboxes, not spam folders? Setting up SPF, DKIM, and DMARC is the key to email authentication and successful mailbox warming. These protocols ensure your emails are trusted by providers like Gmail and Yahoo, improving deliverability and protecting your domain from phishing attacks.
- SPF: Specifies which servers can send emails on your behalf.
- DKIM: Adds a cryptographic signature to verify email integrity.
- DMARC: Defines how to handle emails failing SPF/DKIM checks and provides reporting.
Without these, 46% of emails fail to reach inboxes. Proper setup can boost delivery rates by up to 10% and reduce phishing risks by 70%. This guide walks you through generating records, updating DNS, and testing configurations to ensure a smooth mailbox warming process. Automating these steps with tools like Zapmail can save time and eliminate errors.
Keep reading to learn how to configure SPF, DKIM, and DMARC for reliable email performance.
SPF DKIM DMARC Setup Process for Email Authentication
Setting Up SPF for Mailbox Warming
How to Generate an SPF Record
An SPF record defines which servers are authorized to send emails on behalf of your domain. These records always begin with v=spf1 and conclude with a qualifier, such as ~all or -all.
Here’s an example for Google Workspace:
v=spf1 include:_spf.google.com ~all For Microsoft 365, the SPF record looks like this:
v=spf1 include:spf.protection.outlook.com -all The include mechanism incorporates your email provider’s SPF record, which lists their approved servers. The qualifier at the end determines how unauthorized emails are handled: ~all flags them as suspicious (softfail), while -all rejects them completely. Avoid using +all, as it undermines your domain’s security.
Adding SPF Records to Your DNS
To add an SPF record, follow these steps:
- Log in to your domain registrar’s DNS management panel.
- Create a new TXT record with these settings:
- Host: Use
@or leave it blank, depending on your registrar’s requirements. - Value: Paste your SPF record string here.
- TTL: Set it to 3600 seconds or use the registrar’s default value.
- Host: Use
Make sure your domain has only one SPF record that consolidates all authorized services. It’s important to note that DNS changes can take 24–48 hours to propagate globally. Once the changes are live, you can test your SPF configuration to ensure everything is set up correctly.
Testing and Verifying Your SPF Configuration
After adding your SPF record, use online tools like MX Toolbox SPF Checker or dmarcian SPF Surveyor to confirm everything is working as intended. These tools help you:
- Identify syntax errors.
- Ensure your SPF record stays within the 10 DNS lookup limit, which is crucial to avoid authentication issues.
You can also run a live test by sending an email to Gmail. Open the "Show original" option in Gmail and check the Authentication-Results header for spf=pass.
Here’s a quick reference table for testing:
| Verification Method | What to Check | Expected Result |
|---|---|---|
| Syntax Check | MX Toolbox or dmarcian | "Record Valid" with no errors |
| Lookup Count | SPF Record Checker | Total lookups ≤ 10 |
| Live Email Test | Gmail’s "Show Original" | spf=pass in the headers |
Allow at least 24 hours for your DNS changes to propagate before conducting final tests. This ensures the new settings are fully applied across global DNS servers.
Setting Up DKIM for Mailbox Warming
Generating a DKIM Key Pair
DKIM authentication works by using a public-private key pair to ensure your emails remain unchanged during delivery. The private key stays on your email server, signing outgoing messages, while the public key is added to your DNS. This setup allows receiving servers to verify the authenticity of your emails.
The steps for generating this key pair depend on your email provider. For Google Workspace, head to the Google Admin console and navigate to Apps > Google Workspace > Gmail > Authenticate email. Choose your domain and click Generate New Record to create the key pair.
If you’re using Microsoft 365, go to the Microsoft Defender portal, access the Email authentication settings, and select the DKIM tab. Then, choose Create DKIM keys for your domain.
During this process, you’ll encounter something called a selector, such as "google" for Google Workspace or "selector1" for Microsoft. This selector helps identify the specific DKIM key in your DNS records. You’ll also need to decide between 1024-bit and 2048-bit encryption. Always go with 2048-bit keys – they provide stronger security, which is crucial as shorter keys are more susceptible to attacks.
Setting up DKIM correctly plays a big role in building trust for your mailbox, which is especially important during mailbox warming. Once your keys are generated, give your email provider some time to enable the feature, and then move on to publishing the public key in your DNS.
Adding DKIM Public Keys to DNS
Once you’ve generated your key pair, the next step is to publish the public key in your DNS records. The type of record you’ll create depends on your email provider. For Google Workspace, you’ll use a TXT record, while Microsoft 365 requires CNAME records.
To get started, access your DNS management panel. For Google Workspace, create a TXT record with the hostname google._domainkey and paste the public key string, which begins with v=DKIM1; k=rsa; p=.... If you’re using Microsoft 365, you’ll need to create two CNAME records: selector1._domainkey and selector2._domainkey, pointing to your associated .onmicrosoft.com domain.
Set the TTL (Time to Live) to 3600 seconds and save the changes. Keep in mind that DNS propagation can take anywhere from 48 to 72 hours to update globally. For Google Workspace users, make sure not to click Start Authentication in the Admin console until the TXT record has been successfully saved in your DNS.
If you’re planning to send emails from a subdomain, like marketing.example.com, you’ll need to set up a separate DKIM configuration for that subdomain. Before adding any new records, use tools like MX Toolbox to check whether a DKIM record already exists. This helps avoid conflicts that could disrupt your email setup.
By completing this step, you ensure your emails meet strict authentication standards, which is critical for maintaining high deliverability rates during mailbox warming.
Validating Your DKIM Configuration
After DNS propagation is complete, it’s time to confirm that your DKIM setup is working. For Google Workspace, check the Admin console to see if the status has updated to "Authenticating email with DKIM." For Microsoft 365, verify in the Microsoft Defender portal that DKIM is active.
To test your configuration, send an email to a Gmail account and check the Authentication-Results header for dkim=pass. Open the email, click the three-dot menu, and select Show original. If you see dkim=pass, it means the receiving server successfully verified your DKIM signature.
You can also use online tools like MX Toolbox DKIM Checker or dmarcian to double-check that your public key is correctly published and free from syntax errors. These tools can help you catch any issues that might impact your email deliverability, ensuring a smoother mailbox warming process.
Setting Up DMARC for Mailbox Warming
Creating a DMARC Policy
Before creating your DMARC policy, make sure your SPF and DKIM records have been active for at least 48 hours.
Start with a monitoring policy by setting p=none. This setup allows you to gather data on your email traffic without risking legitimate messages being blocked or flagged as spam.
"DMARC allows you to apply different ‘policies’ to email that appears unaligned with your domain. When first publishing your record, we suggest you start with ‘none’. This allows you to collect data without affecting your email streams." – dmarcian
Here’s a basic DMARC record example:
v=DMARC1; p=none; rua=mailto:dmarc-reports@yourdomain.com In this record:
vspecifies the DMARC version.pdefines the policy.ruaindicates where to send aggregate reports.
Adding Reporting Addresses for DMARC
To handle DMARC reports, set up a dedicated mailbox like dmarc-reports@yourdomain.com. This prevents your personal inbox from being overwhelmed by the high-volume XML reports. The rua tag in your DMARC record ensures that aggregate reports are sent to this mailbox. These reports, typically delivered every 24 hours, provide insights into which senders are using your domain and whether their messages pass authentication.
Keep in mind that Gmail does not support the ruf tag for forensic reports due to privacy concerns. Instead, focus solely on aggregate reports via the rua tag. Additionally, as of February 1, 2024, Gmail and Yahoo require DMARC records for bulk senders (those sending over 5,000 emails daily) and enforce strict spam complaint limits – below 0.1%, with a hard cap at 0.3%.
Once your reporting is configured, you can move forward with publishing and refining your DMARC policy.
Publishing and Refining Your DMARC Policy
To publish your DMARC policy, create a TXT record for _dmarc in your DNS panel and include your DMARC string.
For the first 2–4 weeks, use the p=none policy to monitor your email traffic. During this period, review aggregate reports to ensure all legitimate email sources – such as CRMs, billing systems, and support platforms – are authenticated through SPF and DKIM.
Once all legitimate senders are verified, you can start tightening your policies. Transition to p=quarantine to send unauthenticated emails to spam. Use the pct parameter to gradually apply this policy to a portion of your traffic, starting with pct=25 and increasing it incrementally over several weeks.
"DMARC implementation follows three phases that prioritize safety while building complete protection: Discovery (p=none), Testing (p=quarantine), and Enforcement (p=reject)." – Daniyal Dehleh, Email Deliverability Expert, EmailWarmup.com
Finally, move to p=reject to block all unauthenticated emails. A 100% reject policy signals that your email setup is fully secure and enables advanced features like BIMI (Brand Indicators for Message Identification).
| Phase | Policy | Duration | Key Action |
|---|---|---|---|
| Discovery | p=none |
2–4 weeks | Identify senders and fix authentication gaps |
| Testing | p=quarantine |
4–6 weeks | Gradually apply quarantine using pct |
| Enforcement | p=reject |
Ongoing | Block unauthenticated emails and enable BIMI |
Validation Tools and Troubleshooting
Validation Tools for DNS Records
Once you’ve published your SPF, DKIM, and DMARC records, it’s crucial to ensure they’re working correctly. Tools like MX Toolbox, MailTested, and DMARCLY can help verify that your records exist and are properly formatted. Some of these tools even allow you to send test emails, providing detailed deliverability reports that include DKIM signature checks and DMARC alignment results.
If you’re working with Google Workspace, Google Postmaster Tools and Google CheckMX are invaluable. These tools help you monitor your domain’s reputation and confirm your setup is optimized for Gmail delivery. For ongoing DMARC monitoring, platforms like DMARCian and Postmark DMARC Digests can process and visualize the XML aggregate reports sent to your rua address, making it easier to spot trends or issues.
"SPF, DKIM, and DMARC failures are not random – they’re signals that your domain’s identity isn’t fully trusted." – MailTested Team
These tools are essential for identifying potential problems. Once issues are flagged, you can address them by reviewing common errors outlined below.
Common Issues and How to Fix Them
Some of the most frequent problems include multiple SPF records, mismatched DKIM selectors, and DMARC alignment errors. Keeping your DNS records error-free is key to maintaining strong email deliverability, especially during mailbox warming.
- SPF Records: Having more than one SPF record for a domain will invalidate authentication. Instead, combine all authorized senders into a single TXT entry. If your SPF record exceeds the 10-lookup limit due to numerous
include:statements, consider using SPF flattening to replace some entries with direct IP addresses. - DKIM Failures: Ensure the selector in your DNS (e.g.,
default._domainkey) matches the configuration in your mail server. Another common issue is long DKIM keys being split across multiple lines by DNS providers, which can break the signature. Double-check that the key is entered as a single, unbroken string. - DMARC Alignment Errors: These occur when the domain in the visible "From" address doesn’t match the domain authenticated by SPF or DKIM. To fix this, check your DMARC record settings. Using relaxed alignment (
aspf=randadkim=r) is often a good choice for organizations that need more flexibility.
To troubleshoot authentication in real-world scenarios, use tools like Gmail’s "Show Original" or Outlook’s "View Message Details" to see whether your emails are passing or failing authentication checks. This hands-on approach can help pinpoint any lingering issues.
sbb-itb-36f7bf9
Automating Mailbox Warming with Zapmail
Zapmail’s Automated DNS Setup
Zapmail takes the hassle out of manual DNS configurations, streamlining the entire mailbox warming process. Traditionally, setting up SPF, DKIM, and DMARC records can be tedious and prone to mistakes. Zapmail eliminates this challenge by automating the setup as soon as you purchase or connect a domain. Within just 5 to 10 minutes, your domain is fully configured and ready for outreach, saving you time and effort.
In addition to authentication protocols, Zapmail also automates MX records, custom tracking domains, and workspace isolation. This means that even if one domain is misconfigured, it won’t affect others in your system.
"Instant email infra setup (SPF/DKIM/DMARC, routing, masking) zero human error, all done by software." – Enoch Chang, Co-Founder, Cymate
By automating the setup, Zapmail minimizes the risk of alignment errors and configuration mistakes – issues that can harm sender reputation or trigger spam filters during mailbox warming. Precision here is essential to ensure your emails land where they’re supposed to.
Pre-Warmed Mailboxes with Zapmail
Zapmail goes a step further by offering pre-warmed mailboxes, cutting down the traditional warming period from weeks to immediate readiness. These mailboxes come with 12 weeks of sending history, allowing you to launch campaigns right away. Hosted on US and EU IP addresses, they use clean, realistic domain names that easily pass spam filters. Plus, each mailbox operates in its own isolated workspace, so any issues with one domain won’t disrupt the rest of your sending setup.
Take Mike Black, Founder of Talent Stream, for example. He scaled his outreach significantly by using 24 domains and 72 inboxes, all at a reasonable cost. This approach allowed him to dramatically increase his daily contact capacity.
Zapmail’s track record speaks for itself: over 330,000 domains and 1 million mailboxes configured, all with an average setup time of just 5 minutes. It’s a testament to the platform’s efficiency and reliability for both individual users and agencies.
Integration with Outreach Platforms
Once your mailboxes are prepped and ready, Zapmail makes it easy to integrate with more than 50 leading outreach platforms, including Instantly, Smartlead, Lemlist, and Woodpecker. With one-click OAuth integrations, you can bypass the need for manual SMTP configuration or sharing sensitive credentials. This not only speeds up the process but also enhances security.
"Zapmail makes email deliverability easy. Buy domains, set up your email accounts fast, and manage everything from one simple dashboard." – Shivam Kumar, Founder, ColdStory
Zapmail also offers AI-powered tools like the "Instant Domain Genie" for creating brand-ready domain names and the "Smart Mailbox Namer" for generating professional email handles. These features are especially useful when scaling across multiple domains and workspaces, making it simpler to grow your outreach efforts efficiently.
Conclusion
Key Takeaways
SPF, DKIM, and DMARC are the backbone of successful mailbox warming efforts. Without these authentication protocols, even the best-planned strategies can falter, leaving your emails stuck in spam folders instead of reaching your audience.
Big players like Gmail and Outlook now demand these protocols for bulk senders. They’re not just about compliance – they actively shield your domain from spoofing, safeguard your reputation, and unlock tools like Google Postmaster to help you track and improve your email performance.
Here’s a striking statistic: around 80% of email deliverability problems come down to poor infrastructure. By implementing these protocols, you can improve deliverability by as much as 10% and stay well under Gmail’s spam complaint threshold of 0.3%.
"Landing in the Primary Inbox is tougher than ever. Deliverability isn’t just about what you send. It’s about where you send it from." – Robert Bradley, Founder, Korus GTM
These challenges highlight the value of automation. Setting up DNS records manually is not only time-consuming but also prone to mistakes. Automated platforms like Zapmail simplify the process, configuring SPF, DKIM, and DMARC in just 5 to 10 minutes. This eliminates human error and gets your mailboxes ready for campaigns much faster. With proper authentication in place, you’re laying the groundwork for a reliable, high-performing email system that protects your sender reputation for the long term.
How To Verify That Your SPF, DKIM & DMARC Records Are Correct [2.5]
FAQs
What are SPF, DKIM, and DMARC, and how do they improve email deliverability?
SPF, DKIM, and DMARC are essential tools for email authentication, designed to keep your messages out of spam folders and ensure they reach their intended recipients. Here’s how they work:
- SPF (Sender Policy Framework): Defines which mail servers are allowed to send emails on behalf of your domain, helping to prevent unauthorized use.
- DKIM (DomainKeys Identified Mail): Adds a cryptographic signature to your emails, ensuring recipients can verify the message hasn’t been altered during transit.
- DMARC (Domain-based Message Authentication, Reporting, and Conformance): Combines SPF and DKIM, enforcing alignment between them and offering detailed reports to monitor any unauthorized activity.
Using these protocols builds trust with mailbox providers, boosting your email deliverability while safeguarding your domain against spoofing and phishing attempts.
How can I automate the setup of SPF, DKIM, and DMARC records?
Zapmail takes the hassle out of configuring SPF, DKIM, and DMARC records by automating the entire process. Here’s how it streamlines the setup:
- Add and verify your domain: Start by uploading your domain to Zapmail. It will confirm your ownership before moving forward.
- Enable DNS automation: Turn on Zapmail’s DNS automation to handle the technical details of creating the required records.
- Automatic record generation: Zapmail generates all the necessary records for you, including:
- SPF: For example,
v=spf1 include:spf.protection.outlook.com -all - DKIM: CNAME records for email authentication
- DMARC: For example,
v=DMARC1; p=none; rua=mailto:reports@yourdomain.com
- SPF: For example,
- Push records to your DNS provider: Zapmail can either update your DNS zone directly using an API or provide the records for you to add manually.
- Validate the setup: Once everything is in place, Zapmail runs a health check to confirm the records are live and properly configured.
This automation makes it easy to prepare your domain for mailbox warming while improving email deliverability.
Why should you monitor DMARC reports during mailbox warming?
Monitoring DMARC reports plays a crucial role during mailbox warming. It ensures your email authentication protocols – SPF, DKIM, and DMARC – are set up correctly. These reports give you a clear view of any potential issues, such as misconfigurations or unauthorized domain use, so you can address them before they impact your sender reputation or email deliverability.
By analyzing DMARC reports, you can catch spoofing attempts early, protect your domain’s credibility, and keep your mailbox warming process on track for better email outreach performance.