API rate limits are rules that control how often you can send requests to a server in a set timeframe. If you exceed these limits, you’ll encounter HTTP 429 errors, which means you’ve sent too many requests. Managing these limits effectively is critical to ensuring your system runs smoothly without interruptions.
Here’s a quick breakdown of the key strategies covered:
- Understand Rate Limits: These are short-term restrictions (e.g., per second or minute), different from quotas, which are long-term caps.
- Common Algorithms: Fixed Window, Sliding Window, Token Bucket, and Leaky Bucket are the main methods for handling rate limits.
- Practical Techniques:
- Combine requests with batching to reduce API calls.
- Use exponential backoff with jitter for retries after hitting limits.
- Implement request queues and caching to minimize traffic and improve performance.
- Monitoring and Communication:
- Include rate limit details in API responses (e.g.,
X-RateLimit-Remaining). - Use dashboards to track usage and set alerts for potential issues.
- Include rate limit details in API responses (e.g.,
API Rate Limiting Explained ⚡️| What its and why it’s important for API management? #APIRateLimiting
Common API Rate Limiting Algorithms
API Rate Limiting Algorithms Comparison: Fixed Window, Sliding Window, Token Bucket, and Leaky Bucket
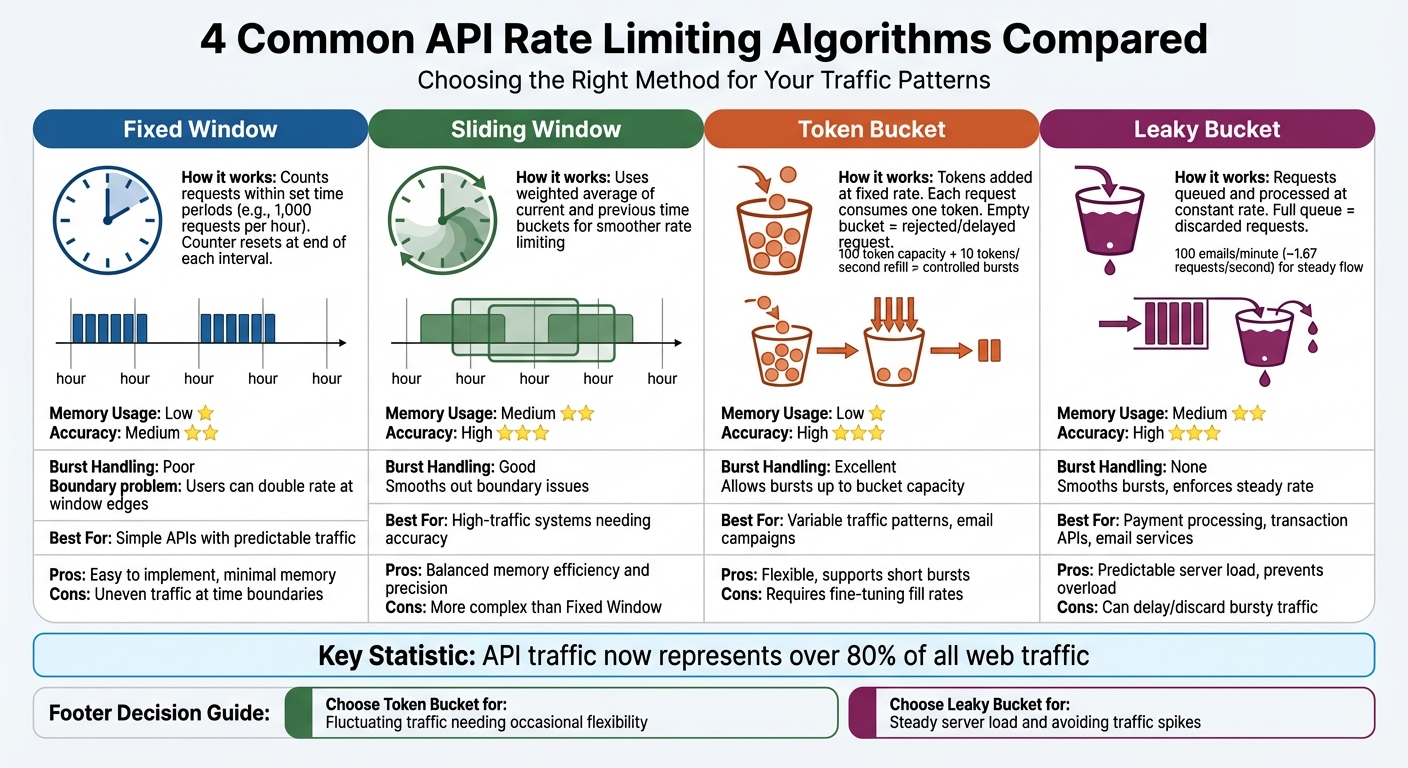
Rate limiting algorithms balance memory usage, accuracy, and how well they handle traffic bursts. Each algorithm has its strengths and weaknesses when managing spikes. With API traffic now making up over 80% of all web traffic, picking the right method is a crucial decision.
The four most widely used algorithms are Fixed Window, Sliding Window, Token Bucket, and Leaky Bucket. Fixed and Sliding Window methods count requests over specific time intervals, while Token and Leaky Bucket approaches rely on virtual buckets to control the flow. Let’s break down how Fixed and Sliding Window algorithms address different needs.
Fixed Window and Sliding Window
Fixed Window algorithms count requests within set time periods – like 1,000 requests per hour. At the end of each interval, the counter resets. This method is straightforward to implement and uses minimal memory, making it a good fit for simpler APIs.
However, Fixed Window algorithms have a "boundary problem." For instance, a user could send 1,000 requests at 11:59 AM and another 1,000 at 12:00 PM, effectively doubling their rate in just two minutes. This creates uneven, bursty traffic patterns at the edges of time windows.
Sliding Window algorithms address this issue by offering smoother rate limiting. The Sliding Window Log method keeps a log of every request for precise tracking but can be resource-intensive. A more efficient option is the Sliding Window Counter, which calculates a weighted average of the current and previous time buckets. This approach approximates a sliding window while using far less memory.
The Sliding Window Counter strikes a good balance between memory efficiency and accuracy, making it ideal for high-traffic systems. To reduce bursts in Fixed Window setups, you can combine a larger window (e.g., 1,000 requests per hour) with a more granular limit (e.g., 5 requests per second).
Token Bucket and Leaky Bucket
Token Bucket algorithms work by adding tokens to a "bucket" at a fixed rate. Each API request consumes one token, and if the bucket is empty, the request is either delayed or rejected. The bucket has a maximum capacity, allowing users to save up tokens and make short bursts of requests when needed. This flexibility makes it ideal for handling variable traffic patterns, such as sending out an email campaign.
For example, a token bucket with a capacity of 100 tokens and a refill rate of 10 tokens per second lets users make quick bursts during high-demand events while maintaining a steady long-term limit.
Leaky Bucket algorithms take a different approach. Incoming requests are placed in a queue and processed at a fixed, constant rate, no matter how quickly they arrive. If the queue fills up, any additional requests are discarded. This ensures a predictable server load and prevents sudden spikes from overwhelming backend systems.
For instance, an email service might use a leaky bucket to limit outgoing messages to 100 per minute (~1.67 requests per second). This steady flow prevents the service from being flagged as spam by external providers.
Here’s a quick comparison of the two:
| Feature | Token Bucket | Leaky Bucket |
|---|---|---|
| Primary Goal | Allow controlled bursts while maintaining an average rate | Enforce a consistent, steady outflow of requests |
| Burst Handling | Supports bursts up to the bucket’s capacity | Smooths out bursts; does not allow them |
| Best For | APIs with variable traffic patterns | Payment processing, transaction APIs, email services |
| Pros | Flexible; allows short bursts | Predictable server load; prevents overload |
| Cons | Requires fine-tuning fill rates and capacity | Can delay or discard bursty traffic |
Use the Token Bucket method if your API consumers have fluctuating traffic and need occasional flexibility to exceed their average rate. Opt for the Leaky Bucket when you need to maintain a steady server load and avoid sudden traffic spikes.
These algorithms form the foundation for managing API rate limits effectively, setting the stage for more advanced strategies in the next section.
How to Manage API Rate Limits
Effectively managing API rate limits requires thoughtful strategies to avoid disruptions while maintaining smooth operations.
Batching Requests
Batching minimizes the number of API calls by combining multiple operations into a single request. Instead of making separate calls for each action, you can consolidate them into fewer requests, reducing overall traffic.
Start by reviewing the API documentation for any batch or bulk endpoints. For instance, if you’re updating multiple user records, look for an endpoint like /users/batch instead of repeatedly calling /users/{id}. These specialized endpoints are designed to handle multiple operations efficiently.
If batch endpoints aren’t available, consider using GraphQL or Protocol Buffers. These formats allow you to request exactly the data you need in fewer network trips. Always refer to the API documentation for specific batching recommendations.
Critical Note: For write operations (such as POST, PATCH, PUT, or DELETE), maintain a 1-second delay between requests. GitHub, for example, advises this pause to avoid triggering secondary rate limits. For regular polling, vary intervals by ±25% to prevent synchronized traffic spikes.
When batching isn’t enough, implementing retries with exponential backoff can help.
Exponential Backoff
If you encounter a 429 Too Many Requests error, exponential backoff is your go-to strategy. It works by increasing the wait time after each failed attempt – 1 second for the first retry, 2 seconds for the second, 4 seconds for the third, and so on. This gives the API time to recover and reduces unnecessary strain.
Look for headers like Retry-After or X-RateLimit-Reset. If these are missing, wait at least 1 minute before retrying.
To avoid creating new traffic spikes, add jitter (randomized delays) to your backoff times. This ensures multiple clients don’t retry at the same moment. Set a maximum retry limit and cap the wait time to prevent your application from stalling indefinitely during extended outages.
"Continuing to make requests while you are rate limited may result in the banning of your integration." – GitHub
To further optimize, consider using request queues and caching.
Request Queues and Caching
Request queues help regulate traffic by processing requests at a steady pace. Instead of overwhelming the API with a sudden surge of requests, a queue ensures they are sent in a controlled, orderly manner, reducing the risk of hitting secondary rate limits.
For client-side pacing, libraries like Bottleneck in Node.js can enforce rate limits before requests even hit the API. In serverless setups, configure maximum concurrency settings on queue-based event sources (e.g., Amazon SQS) to avoid exhausting your execution quota.
Caching is another effective way to reduce unnecessary calls. Use in-memory solutions like Redis or Memcached to store frequently accessed data that doesn’t change often. For example, cache OAuth access tokens and reuse them until they’re close to expiration, rather than requesting a new token for every call.
Leverage conditional requests by using headers like ETag and Last-Modified. If the data hasn’t changed, the server returns a 304 Not Modified response, which typically doesn’t count against your rate limits. This approach can significantly extend your available quota.
Finally, design your system with a "fail open" strategy. If your caching layer (like Redis) goes down, allow requests to proceed rather than locking out users due to a technical failure in your rate-limiting mechanism.
sbb-itb-36f7bf9
Monitoring and Communicating Rate Limits
Keeping track of API usage and clearly communicating limits to users can go a long way in preventing disruptions and maintaining trust.
Including Rate Limit Details in API Responses
Make your API responses more user-friendly by including rate limit details through headers like X-RateLimit-Limit, X-RateLimit-Remaining, and X-RateLimit-Reset. These headers provide users with a transparent view of their usage and remaining quota.
If a user exceeds their limit, return a 429 Too Many Requests status code along with a Retry-After header. This header specifies exactly how many seconds the user needs to wait before making another request, turning what could be a frustrating error into clear, actionable guidance.
"Providing a Retry-After header transforms a frustrating error into an actionable instruction. It lets developers build smart backoff and retry logic, turning a hard stop into a temporary, manageable pause." – Miquel Palet, Founder & CEO, Late
Here’s a quick breakdown of the headers commonly used for rate limiting:
| Header | Purpose | Example Value |
|---|---|---|
X-RateLimit-Limit |
Total requests allowed in the current window | 5,000 |
X-RateLimit-Remaining |
Requests left in the current window | 450 |
X-RateLimit-Reset |
Unix timestamp when the limit resets | 1,680,312,000 |
Retry-After |
Seconds to wait before retrying | 3,600 |
For more advanced setups, you might explore the RateLimit and RateLimit-Policy headers from the IETF draft standard. These headers support more complex quota policies, including multiple time windows.
Providing these details in API responses not only enhances user experience but also sets the stage for deeper insights through analytics.
Monitoring Usage with Analytics
Dashboards like Prometheus or Grafana are excellent tools for keeping an eye on usage metrics such as endpoint request rates, 429 Too Many Requests errors, and quota trends. Breaking down data by user, API key, or IP address can help you spot usage patterns and potential bottlenecks.
Dynamic rate limiting is another powerful tool – it can reduce server load by up to 40% during peak traffic. To stay ahead of issues, set up automated alerts for key metrics like CPU usage exceeding 80%, error rates above 5%, or response times longer than 500ms.
Additionally, proactive notifications can improve user experience. For instance, automatically emailing users when their RateLimit-Remaining header falls below a certain threshold – say, 10% of their total quota – gives them a chance to adjust their usage before hitting a limit. This kind of communication helps users plan better and avoid disruptions.
Advanced Strategies for Outreach Platforms
Resource-Based Limits and Prioritization
Email outreach platforms need to prioritize API requests based on their importance. For instance, sending a scheduled campaign email takes precedence over retrieving historical analytics, even though both activities use API resources.
A resource-based rate-limiting system focuses on specific endpoints rather than applying a blanket restriction across the entire API. This method ensures that high-demand operations are protected while lighter tasks can proceed without interruption. To implement this, endpoints can be grouped into categories such as Read, Write, and Resource-Intensive tasks. Each category is then assigned thresholds based on its actual impact on system resources like CPU, memory, or bandwidth.
| Endpoint Type | Recommended Limit | Reasoning |
|---|---|---|
| File Upload/Download | 10/minute (burst: 15) | High bandwidth and storage usage |
| Read Operations | 1,000/minute (burst: 1,500) | Minimal system impact |
| Write Operations | 100/minute (burst: 150) | Moderate resource consumption |
| Search Queries | 300/minute (burst: 450) | CPU-intensive tasks |
Dynamic rate limiting plays a crucial role during periods of high system load. For example, if CPU usage exceeds 80%, the system can automatically scale back non-essential requests while ensuring critical operations remain unaffected. This approach has been shown to reduce server strain by up to 40% during peak traffic. Additionally, tiered access models can allocate higher limits to premium users. For instance, Enterprise-level users might access over 1,000 requests per minute, whereas Basic-tier users might be limited to around 60 requests per minute. This ensures that top-tier customers maintain the performance they need.
These strategies, combined with programmatic control, simplify the management of API limits effectively.
Using Zapmail for Programmatic Management

Zapmail’s API offers powerful tools to automate mailbox setup and DNS configuration, making frequent Write operations more efficient for deploying email infrastructure.
With Zapmail’s Pro plan, priced at $299/month [zapmail.ai], you gain access to a suite of API features. These include provisioning pre-warmed Google mailboxes, configuring SPF, DKIM, and DMARC records, and managing workspace-level domain isolation – all through automated calls.
Centralized gateway management ensures you can control rate limits across all infrastructure operations. When integrating with Zapmail’s API, it’s a good idea to include X-RateLimit-Remaining checks in your automation scripts. This allows your systems to dynamically adjust the request pace based on current limits.
Zapmail’s multi-workspace API is designed to scale deployments while staying within rate limits. Plus, its integration with over 50 outreach tools ensures seamless compatibility with your existing tech stack.
A useful tip: implement a fail-open strategy in your automation code. If Zapmail’s API becomes temporarily unavailable, configure your system to allow requests to proceed. This prevents critical outreach operations from being disrupted by a single point of failure.
Conclusion
API rate limiting plays a critical role in ensuring your service remains reliable and accessible to all users. A well-thought-out, multi-layered approach can protect your API while keeping operations running smoothly.
Using a combination of global, key-level, and resource-based limits helps strike the right balance between performance and security. The choice of algorithm should align with your traffic patterns – for example, the Token Bucket algorithm is ideal for managing sudden bursts of traffic, while the Sliding Window technique ensures a steady flow without sudden spikes.
Equally important is clear communication about rate limits. By providing feedback through HTTP 429 status codes and headers like X-RateLimit-Remaining, developers can design applications that adapt to limits, self-throttle, and recover effectively. Dynamic rate limiting has been shown to reduce peak server loads by as much as 40%, and proactive monitoring can help you identify users nearing their limits before frustration sets in. When these strategies are implemented together, your system stays resilient – even during periods of high demand.
FAQs
What’s the difference between Fixed Window and Sliding Window algorithms for API rate limiting?
Fixed Window algorithms operate by counting requests within a fixed time frame – like one minute – using a single counter that resets at the end of each interval. This method is straightforward and uses minimal memory. However, it can cause sudden traffic spikes right at the boundaries when the counter resets.
Sliding Window algorithms take a different approach. They manage limits over a rolling time window by dividing it into smaller sub-intervals. This results in smoother traffic management and more consistent enforcement but requires a bit more memory to handle the additional data.
Each method comes with its advantages, and the right choice depends on the specific demands of your API and the nature of your traffic.
How can I effectively manage API rate limits during high traffic periods?
To handle API rate limits effectively during peak traffic, you can take a few smart steps. Start by batching requests to cut down on the total number of calls, and use exponential backoff to retry failed requests without putting too much strain on the server. Dynamic algorithms, like token-bucket or resource-specific limits, can also help distribute quotas more efficiently and fairly.
Another helpful tactic is caching frequent responses to reduce unnecessary requests. Pair this with real-time traffic monitoring so you can adjust quotas on the fly when demand spikes. These approaches work together to keep your API running smoothly, even during periods of heavy use.
What’s the best way to communicate API rate limits to developers?
Effectively explaining API rate limits is key to helping developers manage their usage and avoid unnecessary errors. Start by creating a clear and detailed documentation page that specifies rate limits for each endpoint. This should include quotas broken down by minute, hour, or day, and highlight any differences based on subscription plans (e.g., free vs. paid tiers). Make sure to also include information about the HTTP headers your API uses – like X-RateLimit-Limit, X-RateLimit-Remaining, X-RateLimit-Reset, and Retry-After – so developers can easily track their usage in real time.
To enhance the experience, offer a developer dashboard where users can monitor their API consumption. This dashboard should display live usage metrics and allow developers to set up alerts when they are nearing their limits. If a rate limit is exceeded, your API should return a 429 Too Many Requests response. This response should include a clear JSON message with details like the reset time and a helpful explanation, so developers know exactly when they can resume sending requests.
Zapmail’s API follows these best practices to ensure smooth integration, even for users with high email outreach needs. Every response includes standard rate-limit headers, while the developer portal provides real-time usage graphs and alerts. If a user hits their limit, the detailed 429 error messages offer clear guidance on when quotas will reset, reducing disruptions and keeping processes running smoothly.