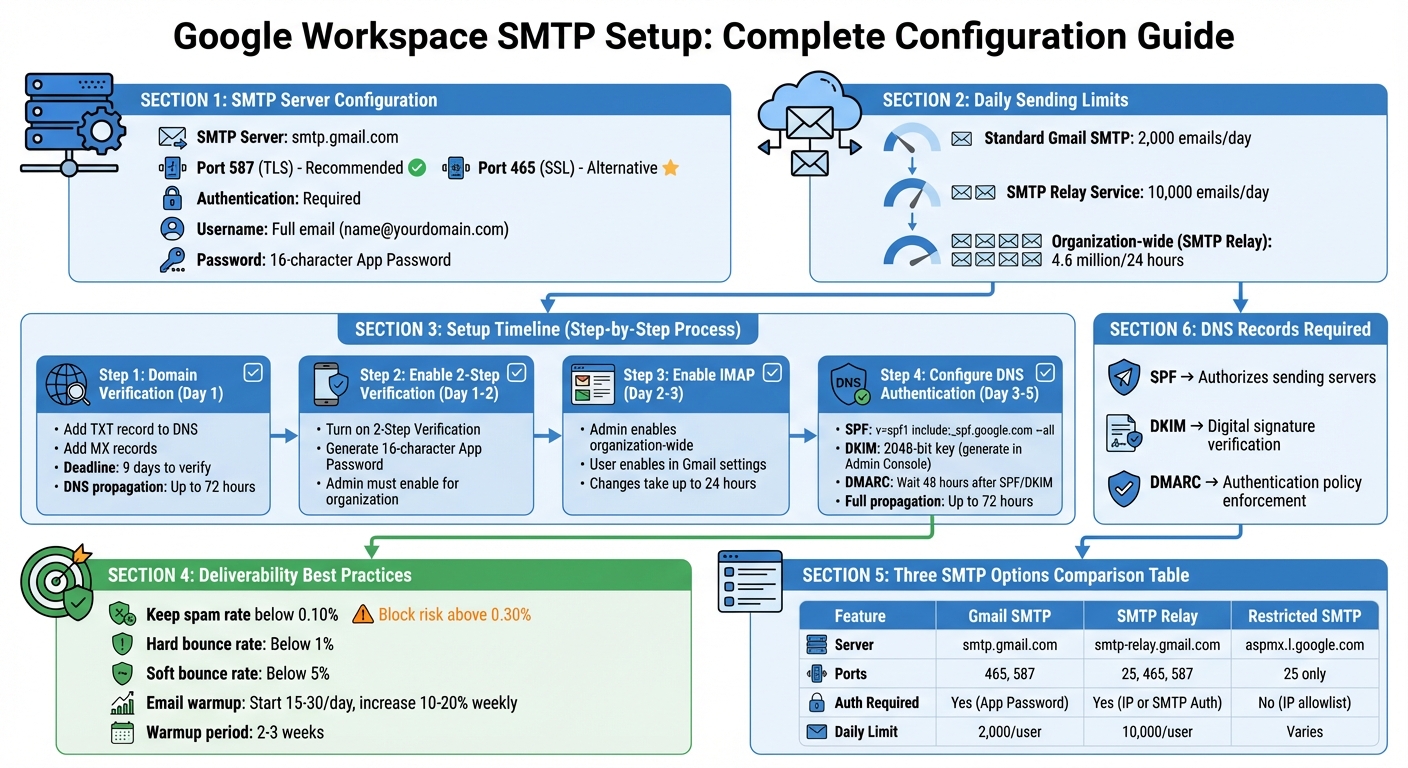
To send reliable, secure emails through Google Workspace, you need to configure SMTP settings correctly. Here’s the key information:
- SMTP Server:
smtp.gmail.com - Ports: Use 587 (TLS) or 465 (SSL).
- Authentication: Required. Use your full email (e.g.,
[email protected]) and a 16-character App Password. - Daily Limits:
- Standard accounts: Up to 2,000 emails/day.
- SMTP Relay: Up to 10,000 emails/day.
Set up requires:
- Domain Verification: Add TXT and MX records in your DNS settings.
- 2-Step Verification: Enable and generate App Passwords.
- IMAP Activation: Turn on IMAP in Gmail and Admin Console.
To boost email deliverability:
- Configure SPF, DKIM, and DMARC in your DNS.
- Keep your spam rate under 0.3%.
- Gradually scale email volume to avoid flags.
For high-volume campaigns, consider using pre-warmed mailboxes like Zapmail, which simplify setup and improve deliverability.
Key Tip: Monitor bounce rates and use tools like Google Postmaster to maintain sender reputation.
Google Workspace SMTP Setup Guide: Complete Configuration Checklist
How To Set Up Gmail SMTP Server (Step-by-Step)
What You Need Before Setting Up SMTP
Before jumping into SMTP configuration, there are three key steps you need to complete. Skipping any of these could lead to connection issues with Google Workspace or problems with email authentication.
Verify Your Domain and Google Workspace Account
The first step is to verify your domain and Google Workspace account. Google requires proof of domain ownership before allowing you to send emails. To do this, you’ll need to add a TXT verification record to your domain registrar’s DNS settings. This applies whether you’re using GoDaddy, Namecheap, Bluehost, or another provider.
Here’s the timeline: you have 9 days from the start of your trial or paid subscription to verify your domain. If you don’t, Google will delete your account within 21 days of signing up.
After verification, update your MX records to route emails through Google’s servers. Keep in mind that DNS changes can take up to 72 hours to fully propagate, so plan ahead.
To confirm your domain’s verification status, log in to the Google Admin console and go to Menu > Account > Domains > Manage domains. The "Status" column will indicate whether your domain is verified. You can also use Google’s Admin Toolbox "Dig" tool to check if your MX and TXT records are correctly set up.
Once your domain and MX records are verified, the next step is securing your account with 2-Step Verification.
Set Up 2-Step Verification and App Passwords
Starting May 1, 2025, Google will only allow third-party access using OAuth or App Passwords (with 2-Step Verification enabled).
If you’re a Google Workspace admin, you’ll need to enable App Password generation for your organization. Go to Admin Console > Security > Authentication > 2-Step Verification and ensure the option to "Allow users to generate app passwords" is enabled.
Next, enable 2-Step Verification by visiting myaccount.google.com/security under "How you sign in to Google." After that, generate an App Password at myaccount.google.com/apppasswords. Choose "Mail" as the app and name it something like "Outreach Tool SMTP" to receive a 16-character code. Be sure to copy this code immediately, as it won’t be visible again. This App Password will replace your regular password when connecting outreach tools.
With your account now secure, you’ll need to enable IMAP for proper email syncing.
Enable IMAP in Your Gmail Settings
IMAP must be activated to allow third-party tools to sync and send emails via your Google Workspace account. This process involves two steps: enabling IMAP at the organization level and then at the individual user level.
First, an administrator needs to enable IMAP for the entire organization. In the Google Admin console, navigate to Menu > Apps > Google Workspace > Gmail > End User Access. Scroll to POP and IMAP access, select Enable IMAP access for all users, and choose "Allow any mail client." Don’t forget to click Save. These changes can take up to 24 hours to apply, though they’re often faster.
Next, each user must enable IMAP in their Gmail settings. Open Gmail, click the Settings gear icon, then select See all settings. Go to the Forwarding and POP/IMAP tab, find the IMAP Access section, and choose Enable IMAP. Be sure to click Save Changes.
With IMAP enabled, you’re ready to configure your SMTP server. Use smtp.gmail.com as the server, port 465 (SSL) or 587 (TLS), your full Google Workspace email address as the username, and the 16-character App Password for authentication.
How to Set Up Google Workspace SMTP
Once you’ve verified your domain, adjusted security settings, and enabled IMAP, you’re ready to integrate Google Workspace SMTP with your outreach tool. Here’s how to do it in three steps.
Step 1: Enable IMAP/POP in Gmail Settings
First, ensure IMAP is enabled. Open Gmail, click the gear icon, and select "See all settings." From there, go to the "Forwarding and POP/IMAP" tab, enable IMAP, and hit "Save Changes." IMAP is crucial because it allows two-way syncing of your "Sent" and "Replied" folders – key for monitoring engagement in your outreach campaigns.
Step 2: Generate an App Password
Head to myaccount.google.com/apppasswords to create an App Password. Select "Mail" as the app and "Other" as the device, then give it a name (e.g., "Outreach Tool – [Your Tool Name]") for easy reference. You’ll receive a 16-digit code – make sure to copy it immediately because you won’t be able to view it again. If you lose it, you’ll need to create a new one.
"App passwords are a way to let the blocked app or device access your Google Account." – Google Help
Step 3: Configure SMTP Server Details
In your outreach tool, navigate to the SMTP settings page and input the following details:
| Setting | Value |
|---|---|
| SMTP Server | smtp.gmail.com |
| Port (TLS) | 587 |
| Port (SSL) | 465 |
| Username | Your full email address (e.g., [email protected]) |
| Password | The 16-digit App Password you generated |
| Authentication | Required |
For most cases, use TLS on port 587. If your tool requires SSL, switch to port 465. Your username must be your complete Google Workspace email address, and the password is the 16-digit App Password – not your regular Gmail password.
Note: Gmail’s SMTP server limits sending to around 2,000 emails per day. If you need to send more, consider using the SMTP relay service, which allows up to 10,000 emails per user within a 24-hour period.
DNS Settings for Better Email Deliverability
Once your SMTP is set up, the next step is to authenticate your domain through DNS settings to improve email deliverability. This builds on your SMTP configuration and ensures your email outreach is more secure and trustworthy.
Understanding SPF, DKIM, and DMARC
These three protocols – SPF, DKIM, and DMARC – are critical for email authentication. Here’s how they work:
- SPF (Sender Policy Framework): This protocol specifies which servers are authorized to send emails on behalf of your domain. When an email is received, the server checks the SPF record to confirm the sender’s legitimacy.
- DKIM (DomainKeys Identified Mail): DKIM adds a digital signature to your emails using a public key stored in your DNS. This acts like a seal, ensuring your email hasn’t been tampered with.
- DMARC (Domain-based Message Authentication, Reporting, and Conformance): DMARC lets you define how to handle emails that fail SPF or DKIM checks. You can choose to monitor (
none), flag as spam (quarantine), or block them entirely (reject).
| Protocol | Function | Google Workspace Requirement |
|---|---|---|
| SPF | Authorizes sending IP addresses | Required for all senders |
| DKIM | Verifies email integrity with cryptographic signatures | Required for all senders |
| DMARC | Sets policies for failed authentication | Required for bulk senders (5,000+/day) |
Configuring DNS Records in Google Workspace
Setting up these DNS records is straightforward, but you need to follow the right sequence.
1. SPF Configuration
Start by logging into your DNS provider (e.g., GoDaddy, Cloudflare, or Namecheap) and adding a TXT record. For Google Workspace, use this value:
v=spf1 include:_spf.google.com ~all.
If you use third-party tools like Mailchimp or Zendesk, include their SPF mechanisms as well. For example, with Mailchimp, your SPF record would look like this:
v=spf1 include:_spf.google.com include:servers.mcsv.net ~all.
Make sure all "include" entries appear before the ~all tag, and keep the total lookups under 10 to avoid errors.
2. DKIM Setup
Next, secure your emails with DKIM. In the Google Admin Console, go to:
Apps > Google Workspace > Gmail > Authenticate email.
Choose your domain and generate a new DKIM record. Use a 2048-bit key for added security. You’ll receive a host name (e.g., google._domainkey) and a TXT value. Add both to your DNS provider. After saving the changes, return to the Admin Console and click "Start Authentication" to activate DKIM.
3. DMARC Configuration
Wait about 48 hours for SPF and DKIM to propagate before setting up DMARC. Then, add a TXT record with the host name _dmarc and start with a monitoring policy:
v=DMARC1; p=none; rua=mailto:[email protected].
The rua tag ensures you receive reports on how your emails are being authenticated. Once you’re confident everything is working correctly, you can gradually adjust the policy to p=quarantine or p=reject to tighten security without disrupting legitimate emails.
Verifying Your Setup
To confirm your DNS records are correctly configured, use tools like Google Admin Toolbox’s "Check MX" or "Dig". These tools help ensure your records are visible and formatted properly, giving you confidence in your email authentication setup.
sbb-itb-36f7bf9
Connecting Google Workspace SMTP to Outreach Tools
Once you’ve set up your SMTP and DNS, the next step is to connect your Google Workspace account to your outreach tool. This connection turns your technical setup into a functional email engine for your campaigns.
Linking SMTP to Your Outreach Platform
You’ll need the same server details you configured earlier: smtp.gmail.com, port 587 for TLS or 465 for SSL, and your full email address as the username.
Authentication is required. Starting May 1, 2025, Google Workspace mandates the use of either OAuth (an automated authorization process) or App Passwords (16-character codes generated in your Google Account settings after enabling 2-Step Verification).
"Google Workspace accounts no longer support less secure apps, third-party apps, or devices that ask you to sign in to your Google Account with your username and password. You must use OAuth to let these apps and devices access your account." – Google Workspace Support
For platforms that support OAuth, the connection process is straightforward – just authorize access. For others, you’ll need to generate an App Password as outlined earlier.
After connecting, test your setup by sending a few emails to yourself. Make sure they land in your inbox (not the spam folder) and confirm that your SPF, DKIM, and DMARC records are properly authenticated using tools like Google Admin Toolbox.
If you want to skip manual setup, pre-warmed mailboxes can save you time and help avoid reputation issues from the start.
Using Pre-Warmed Mailboxes with Zapmail
New mailboxes have no reputation, which can lead to spam blocks if you start sending emails immediately. Zapmail offers pre-warmed Google Workspace mailboxes that are ready to send right away. These mailboxes come with automated DNS configuration (SPF, DKIM, and DMARC already set up), US-based IPs for better deliverability, and one domain per workspace to isolate reputation and reduce the risk of bans.
Zapmail integrates with over 50 outreach platforms using OAuth, which eliminates the need for manual App Password generation or troubleshooting SMTP connections.
| Feature | Manual SMTP Setup | Zapmail Automated Infrastructure |
|---|---|---|
| Setup Time | ~30–60 mins per mailbox | ~10 mins (bulk) |
| Connection Method | App Passwords (Manual) | OAuth (Fully Automated) |
| DNS Configuration | Manual SPF/DKIM/DMARC | Automated |
| Warmup | Manual (2–4 weeks) | Pre-warmed (Ready Day 1) |
| Deliverability Risk | Medium (Shared IPs/Admin) | Very Low (Isolated Workspaces) |
In January 2026, Mike Black, founder of Talent Stream, used Zapmail to scale his investor outreach. He purchased 24 domains and 72 inboxes for $527, integrating them with Instantly.ai. This setup increased his daily outreach capacity from 270 to 1,350 emails, helping him reach 20,000 investors for a $2.5M fundraising goal.
"Only 1 domain per workspace gives us absolute risk control and this is the best way to segment a large infra." – Mohan Muthoo, Founder, Spring Drive
Zapmail’s pricing starts at $39/month for 10 mailboxes (Starter Plan), $99/month for 30 mailboxes (Growth Plan), and $299/month for 100 mailboxes (Pro Plan). Additional mailboxes cost between $3.00 and $3.50 each. Domains typically cost around $13 for a .com extension.
Email Outreach Best Practices
Once your SMTP connection is established and your mailboxes are ready, follow these tips to ensure successful email campaigns.
- Start small and increase gradually. Begin by sending 15–30 emails per day per inbox, and scale up by 10–20% weekly over a 2–3 week period to avoid spam filters.
- Monitor bounce rates. Keep hard bounce rates below 1% and soft bounce rates under 5%. Use Google Postmaster Tools to track spam rates, aiming to stay below 0.10% for consistent inbox placement. Rates above 0.30% may trigger blocks.
"80% of deliverability issues come from your email infrastructure, not your copy." – Thibault Garcia, Founder, Reachly
- Spread your emails across multiple inboxes and domains. Instead of sending 500 emails from one inbox, distribute them – e.g., 50 emails each from 10 inboxes across 3–5 domains. This mimics natural sending patterns and protects your domain reputation.
In 2025, Agrello, a digital signing platform, ran 52 targeted campaigns across eight customer personas. Using Zapmail for mailbox setup and Instantly.ai for automation, they generated 789 sales opportunities, showcasing the power of a well-structured outreach strategy.
- Include an easy unsubscribe option. If you’re sending more than 5,000 emails daily, add
List-Unsubscribe-PostandList-Unsubscribeheaders to reduce spam complaints and maintain good deliverability. - Reuse SMTP connections wisely. For high-volume sending, use outreach tools that support connection caching to avoid hitting security limits. Google’s SMTP relay service can handle up to 4.6 million messages in 24 hours at the organizational level when connections are managed effectively.
Fixing Common SMTP Problems
Even with a proper setup, SMTP issues can still pop up. Common challenges include authentication errors, blocked ports, and sending limits. Let’s break down how to handle these problems effectively.
Fixing Authentication and App Password Errors
Authentication failures are among the most frequent SMTP problems. To avoid them, ensure that 2-Step Verification is enabled and that you’ve generated an App Password for your account.
If your SMTP login isn’t working, here’s what to check:
- 2-Step Verification: Confirm that it’s enabled on your Google Workspace account. Without this, App Passwords can’t be created.
- Admin Settings: Ensure your administrator has allowed users to generate App Passwords. This setting is found in the Admin Console under Security > Authentication > 2-Step Verification.
- Correct Password: Use the 16-character App Password instead of your regular Google account password when setting up your outreach tool.
When entering the App Password, type it without spaces and double-check that you’re using your full Google Workspace email address as the username.
If login issues persist, review your port settings. Use Port 587 (TLS) or Port 465 (SSL) – avoid Port 25, as it’s typically blocked.
Once authentication issues are resolved, but you’re still unable to send emails, take a closer look at your port and firewall configurations.
Resolving Port Blocks and Firewall Issues
Port 25 is often blocked by ISPs and firewalls to prevent spam. If your connection times out, switch to Port 587 (TLS) or Port 465 (SSL).
Google Workspace provides three SMTP options, each with specific requirements:
- SMTP Relay Service (
smtp-relay.gmail.com): Supports Ports 25, 465, or 587 and requires IP authentication or SMTP Auth. - Gmail SMTP Server (
smtp.gmail.com): Works with Ports 465 (SSL) or 587 (TLS) and requires your full email address and App Password. - Restricted SMTP Server (
aspmx.l.google.com): Uses only Port 25, requires no authentication, but your IP must be allowlisted.
To confirm your connection, use the "Test TLS connection" feature in the Google Admin console under Apps > Google Workspace > Gmail > Hosts. This tool checks if Google can connect to your mail server and verifies the SSL/TLS handshake.
If you encounter certificate errors, it likely means the hostname you’re using doesn’t match the one on the SMTP server’s certificate. Ensure you’re using the exact hostname listed on the certificate. For third-party relays, contact their support team to confirm their CA-signed certificate is valid.
Managing Google Workspace Sending Limits
Once you’ve fixed authentication and port issues, it’s important to stay within Google Workspace’s sending limits.
Google enforces sending limits on a rolling 24-hour basis – not a reset at midnight. Here’s a quick breakdown:
- Gmail SMTP Server: Allows up to 2,000 messages per day for standard paid accounts.
- SMTP Relay Service: Supports up to 10,000 messages per user daily.
If you exceed these limits, your account will be temporarily suspended from sending emails for up to 24 hours, though you’ll still be able to receive messages. For new paid accounts, sending limits can increase after your domain has paid at least $100 USD. However, this increase can take up to 75 days after meeting the payment threshold.
To avoid hitting these limits:
- Limit each SMTP transaction to 100 recipients by batching larger email lists.
- For organization-wide sending, the SMTP relay service caps at 4.6 million recipients in 24 hours.
For high-volume email campaigns, consider using connection caching. This method reuses existing SMTP connections for multiple messages instead of establishing a new connection for each email. Not only does this improve efficiency, but it also reduces the risk of triggering Denial of Service (DoS) limits.
Finally, monitor your spam rate in Google Postmaster Tools. Keep it below 0.10%, as rates above 0.30% can lead to blocks.
Conclusion
Setting up Google Workspace SMTP correctly is the backbone of effective email outreach. This involves several key steps: enabling IMAP, creating App Passwords, configuring SMTP server details, and fine-tuning DNS records like SPF, DKIM, and DMARC.
Take the time to review your SMTP and DNS settings to ensure everything runs smoothly. A well-optimized setup is crucial – aim to keep your spam rate below 0.10% in Google Postmaster Tools and use 2048-bit DKIM keys for added security.
Another important aspect is domain isolation. This practice safeguards your sender reputation by ensuring that issues in one campaign don’t spill over into your entire email infrastructure. These essential steps create a strong foundation for scalable and dependable email campaigns.
For businesses handling high-volume campaigns, consider using pre-warmed mailboxes through Zapmail. These accounts come with automated DNS settings, US-based IPs, and official Google Workspace Business Starter access, helping you reduce setup time while ensuring reliable inbox placement.
The right setup can make a huge difference. By combining accurate SMTP configurations, robust DNS authentication, domain isolation, and pre-warmed mailboxes, you’ll be well-equipped to achieve consistent deliverability and long-term success in your email outreach efforts.
FAQs
How do I verify my domain for Google Workspace SMTP setup?
To confirm your domain for Google Workspace SMTP, you need to prove ownership by adding a TXT record to your DNS settings. Here’s a quick guide:
- Log in to your Google Admin console and navigate to Domains → Manage domains.
- Select the domain you want to verify, then click on Verify domain.
- Opt for the TXT record method, copy the unique verification code provided by Google, and paste it into your DNS settings via your domain registrar.
- Head back to the Admin console and click Verify. Once the DNS updates take effect – which can range from a few minutes to several hours – your domain will be verified and ready for SMTP setup.
Pro Tip: Consider using tools like Zapmail to streamline this process. They can automate DNS record creation and verification, making email setup faster and hassle-free.
What are the best practices for improving email deliverability with Google Workspace SMTP?
To improve email deliverability with Google Workspace SMTP, it’s crucial to set up the right SPF, DKIM, and DMARC records for your domain. These records authenticate your emails and help prevent spoofing. Also, make sure to follow Google’s email sender guidelines to avoid getting flagged by spam filters.
For better results, use Google’s SMTP relay service or an outbound gateway to route your emails. This helps ensure proper authentication and filtering, reducing the risk of your messages ending up in spam folders. Keep an eye on your domain’s reputation and update your DNS settings as needed to maintain strong deliverability.
How can I fix authentication errors with Google Workspace SMTP?
If you’re running into authentication errors with Google Workspace SMTP, the first step is to double-check your login details. Make sure the email address and password you’re using are correct and current – typos or expired passwords are often the main issue.
For those relying on OAuth 2.0, confirm that your access token is still active. If it’s expired, you’ll need to generate a new one through the Google Cloud console and update it in your email client or outreach tool. Additionally, verify that SMTP authentication is enabled in the Google Workspace admin console for the account you’re working with.
If your account uses two-factor authentication (2FA), standard username and password logins might be blocked. In this case, you have two options: create an app-specific password for SMTP or switch to OAuth 2.0, which works seamlessly with 2FA-enabled accounts. Also, double-check that you’re using the correct SMTP server settings: smtp.gmail.com with port 587 for TLS or 465 for SSL.
For a hassle-free experience, tools like Zapmail can be a game-changer. Zapmail automates the setup of Google Workspace mailboxes, providing pre-configured OAuth credentials, DNS records, and SMTP settings. This not only helps you avoid common errors but also boosts email deliverability.